
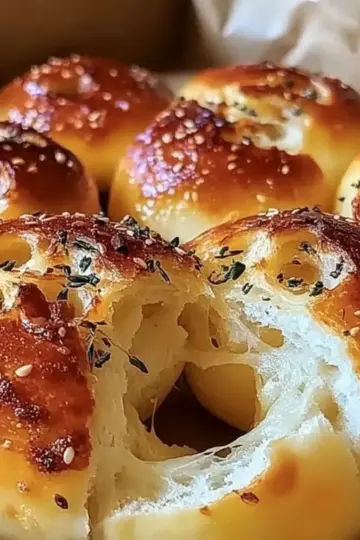
There’s something magical about the warm aroma of freshly baked Pão de Queijo wafting through your kitchen. This delightful Brazilian cheese bread is not just any snack—it’s a slice of comfort that transforms an ordinary day into a special occasion. Made with just a handful of simple ingredients like tapioca flour and Parmesan cheese, this recipe is a quick triumph: ready in just 30 minutes and gluten-free to boot! With its golden, crispy exterior and soft, cheesy interior, Pão de Queijo is perfect for breakfast, an afternoon treat with coffee, or even a show-stopping appetizer when you have friends over. Are you ready to dive into this delightful culinary adventure? Let’s get started!

Why is Pão de Queijo so beloved?
Simplicity: This recipe is straightforward, requiring no advanced baking skills—anyone can master it!
Irresistible Flavor: The delightful combination of gooey cheese and the subtle nuttiness of tapioca flour creates a unique taste you won't forget.
Versatile: Enjoy it warm on its own, or fill it with your favorite ingredients for a twist!
Quick to Make: Ready in just 30 minutes, making it a perfect solution for unexpected cravings or last-minute gatherings.
Crowd-Pleaser: Perfect for brightening up brunches or snack times, this cheese bread is sure to impress family and friends!
Pão de Queijo Ingredients
For the Batter
• 1 cup tapioca flour – This gluten-free base gives Pão de Queijo its signature chewy texture.
• ½ cup milk – Use whole milk for a richer flavor; almond or soy milk works for a dairy-free option.
• ¼ cup vegetable oil – Helps create that delightful crispy exterior; olive oil is a tasty substitute.
• 1 teaspoon salt – Enhances the overall flavor of this authentic Brazilian cheese bread.
• 1 cup grated Parmesan cheese – The star ingredient that melts beautifully, adding a rich, cheesy goodness.
• 2 large eggs – Binds the mixture together while providing a fluffy texture for your Pão de Queijo.
Optional Fillings
• Pulled chicken – For a savory twist, this can also turn Pão de Queijo into a delightful meal.
• Herb cream cheese – Adds a luxurious touch, making it the perfect upscale appetizer for gatherings.
Make sure to gather these ingredients so you can create your own batch of Pão de Queijo, a truly loved Brazilian cheese bread!
Step‑by‑Step Instructions for Pão de Queijo: Authentic Brazilian Cheese Bread
Step 1: Preheat the Oven
Start by preheating your oven to 400°F (200°C). This ensures a beautifully cooked Pão de Queijo with a crisp exterior and soft interior. While the oven warms up, gather your mixing bowl and saucepan for the next steps, keeping your workspace organized for seamless preparation.
Step 2: Heat the Liquid Mixture
In a medium saucepan, combine ½ cup of milk, ¼ cup of vegetable oil, and 1 teaspoon of salt. Bring this mixture to a boil over medium heat, stirring occasionally to prevent sticking. The combination will bubble up nicely, releasing a warm aroma that sets the stage for your Pão de Queijo.
Step 3: Combine with Tapioca Flour
Once boiling, carefully pour the hot milk mixture over 1 cup of tapioca flour in a large mixing bowl. Stir quickly with a wooden spoon until the mixture is thoroughly combined and a dough starts to form. The heat from the liquid activates the tapioca, giving it that signature chewy texture typical in authentic Brazilian cheese bread.
Step 4: Incorporate the Eggs
Allow the mixture to cool for a few minutes until it’s comfortable to the touch, then crack in 2 large eggs, one at a time. Mix well after each addition until the batter is perfectly smooth and homogenous. This critical step ensures your Pão de Queijo will have that delightful fluffiness we all love.
Step 5: Add the Cheese
Gently fold in 1 cup of grated Parmesan cheese into the batter until it’s evenly distributed. The cheese is the star of this dish, contributing rich flavors and helping the dough rise beautifully as it bakes. Your mixture should be thick yet pourable, ready for the next stage.
Step 6: Shape the Dough
With wet hands (this prevents sticking), take small amounts of the dough and roll them into bite-sized balls, about the size of a golf ball. Place each ball on a baking sheet lined with parchment paper, ensuring they have enough space to puff up while baking. The sight of these little dough balls will get you excited for the delicious Pão de Queijo ahead!
Step 7: Bake the Pão de Queijo
Slide the baking sheet into your preheated oven and bake for 15-20 minutes. Keep an eye on them, and look for a golden-brown color and a puffed-up shape to know they’re done. Once cooked, the aroma filling your kitchen will be irresistible, signaling that your homemade Pão de Queijo is ready to be enjoyed.

Storage Tips for Pão de Queijo
Room Temperature: Keep leftover Pão de Queijo in an airtight container at room temperature for up to 2 days—this helps maintain their delightful texture.
Fridge: For longer freshness, store the cheese bread in the fridge for up to 5 days. Reheat in the oven for 5-7 minutes to restore the crispy exterior.
Freezer: Unbaked dough balls can be frozen on a sheet pan. After they're firm, transfer them to a bag and store for up to 3 months. Bake from frozen, adding 3-5 extra minutes.
Reheating: To enjoy pre-baked Pão de Queijo the next day, simply reheat in the oven at 350°F (175°C) for 5-7 minutes for that fresh-out-of-the-oven taste.
Expert Tips for Pão de Queijo
Use Fresh Ingredients: Make sure your Parmesan cheese is fresh for the best flavor and creaminess in your cheese bread.
Avoid Dry Dough: If your dough seems too dry while mixing, a splash of milk can help achieve the perfect texture.
Test for Doneness: Look for a golden-brown color; if they’re lightly colored, they may not have that delightful crisp exterior you desire.
Shape Consistently: Roll the dough balls to a uniform size for even baking; this will help them puff up perfectly.
Serve Warm: Enjoy Pão de Queijo immediately out of the oven for the ultimate experience; reheat only briefly to restore its texture!
Follow these expert tips to ensure your Pão de Queijo turns out deliciously every time—just like they do in Brazil!
Make Ahead Options
These delightful Pão de Queijo are perfect for meal prep enthusiasts looking to save time! You can prepare the dough ahead and refrigerate it for up to 2 days. Simply follow the first five steps of the recipe, and once your dough is shaped into balls, store them in an airtight container in the fridge. For longer storage, freeze the unbaked dough balls on a parchment-lined baking sheet and then transfer them to a freezer bag, where they can last for up to 3 months. When you're ready to bake, just pop them straight from the freezer into a preheated oven, adding an extra 3-5 minutes to the baking time. This way, you'll enjoy that irresistible cheesy goodness just as fresh as if they were made today!
What to Serve with Pão de Queijo
Imagine the joy of creating a memorable meal, savoring each bite alongside delightful companions.
-
Fresh Salada Verde: A light and crisp green salad adds a refreshing contrast to the cheesy richness of Pão de Queijo.
-
Sliced Avocado: Creamy avocado complements the crispy exterior, enhancing the overall indulgent experience.
-
Sweet Chili Sauce: Drizzling a bit of sweet chili sauce over your Pão de Queijo provides a zesty kick that balances the cheese perfectly.
-
Café au Lait: The smoothness of this coffee-milk blend elevates your snack time, creating a comforting atmosphere for relaxation.
-
Roasted Tomatoes: Their acidity and sweetness cut through the richness, pairing beautifully with the soft, gooey cheese bread.
-
Herb Cream Cheese Dip: This upscale option for dipping enhances the flavor profile, providing a luxurious touch to your appetizers.
-
Savory Chicken Fillings: Adding pulled chicken to the cheese bread adds a heartiness that transforms it into a fulfilling meal.
-
Passion Fruit Juice: The tanginess of this refreshing drink cleanses the palate, making each bite of Pão de Queijo a new experience.
Pão de Queijo: Customizable Delights
Feel free to explore these scrumptious variations that will make your Pão de Queijo even more delightful!
-
Dairy-Free: Substitute the milk with almond or coconut milk and replace Parmesan with a dairy-free cheese alternative.
-
Herb-Infused: Add fresh or dried herbs like rosemary or thyme to the dough for aromatic flair that elevates the flavor profile beautifully.
-
Spicy Twist: Incorporate chopped jalapeños or red pepper flakes into the batter for a fiery kick—spice lovers will rejoice!
-
Nutty Flavor: Mix in ground flaxseeds or chia seeds for added nutrients and a slight nutty taste, perfect for health-conscious eaters.
-
Cheesy Variety: Combine different cheese types like mozzarella or cheddar with the Parmesan for a melty fusion that will keep everyone guessing!
-
Veggie-Packed: Fold in finely chopped spinach or sun-dried tomatoes to create a colorful and flavorful version that adds complexity and nutrition.
-
Sweet Option: For a unique treat, experiment with a touch of sugar and serve with a chocolate or fruit dip—perfect for dessert lovers!
-
Mini Bites: Shape smaller dough balls for bite-sized Pão de Queijo, making them ideal for parties or gatherings, and watch them disappear in no time!

Pão de Queijo: Authentic Brazilian Cheese Bread Recipe FAQs
What type of tapioca flour should I use for Pão de Queijo?
Absolutely! For the best results, you’ll want to use fine tapioca flour, often labeled as “tapioca starch.” This will ensure your dough has that perfect chewy texture. The right tapioca flour can usually be found in the gluten-free section of your grocery store or in specialty markets.
How should I store leftover Pão de Queijo?
The more, the merrier! Leftover Pão de Queijo should be stored in an airtight container at room temperature for up to 2 days to keep their delightful texture. For longer freshness, you can refrigerate them for up to 5 days and reheat in the oven for 5-7 minutes at 350°F (175°C) to restore that crispy exterior.
Can I freeze unbaked Pão de Queijo balls?
Yes, you can! To freeze the dough, shape your unbaked Pão de Queijo balls and place them on a sheet pan. Freeze until firm, then transfer the balls into a zip-top bag and store for up to 3 months. When you're ready to enjoy, bake them directly from the freezer, adding an extra 3-5 minutes to the baking time.
What should I do if my dough is too dry?
If your dough seems dry while mixing, don't worry! Just add a splash of milk, one tablespoon at a time, mixing well after each addition until the texture improves. The dough should be thick yet pliable—aim for a consistency that holds its shape when rolled into balls but doesn’t crack.
Are there any dietary considerations I should be aware of?
Yes! Pão de Queijo is naturally gluten-free thanks to tapioca flour, making it a great option for those with gluten sensitivities. However, ensure that your Parmesan cheese is checked for any allergens, especially if you're serving guests. If you have lactose issues, consider using lactose-free milk and cheese alternatives.
How can I make my Pão de Queijo extra cheesy?
Want to amp up that cheese factor? Besides using Parmesan, you can mix in additional cheeses like mozzarella for extra gooeyness or cheddar for a sharp flavor twist. Simply fold your chosen cheese into the batter after the eggs for a truly decadent treat!

Irresistibly Cheesy Pão de Queijo: Authentic Brazilian Bliss
Ingredients
Equipment
Method
- Preheat your oven to 400°F (200°C) to ensure a beautifully cooked Pão de Queijo.
- In a medium saucepan, combine ½ cup of milk, ¼ cup of vegetable oil, and 1 teaspoon of salt. Bring to a boil over medium heat.
- Once boiling, pour the hot milk mixture over 1 cup of tapioca flour in a large mixing bowl. Stir until a dough forms.
- Allow the mixture to cool slightly, then crack in 2 large eggs, mixing well after each addition until smooth.
- Gently fold in 1 cup of grated Parmesan cheese until evenly distributed.
- With wet hands, roll the dough into bite-sized balls and place on a baking sheet lined with parchment paper.
- Bake for 15-20 minutes until golden-brown and puffed up.
Leave a Reply