
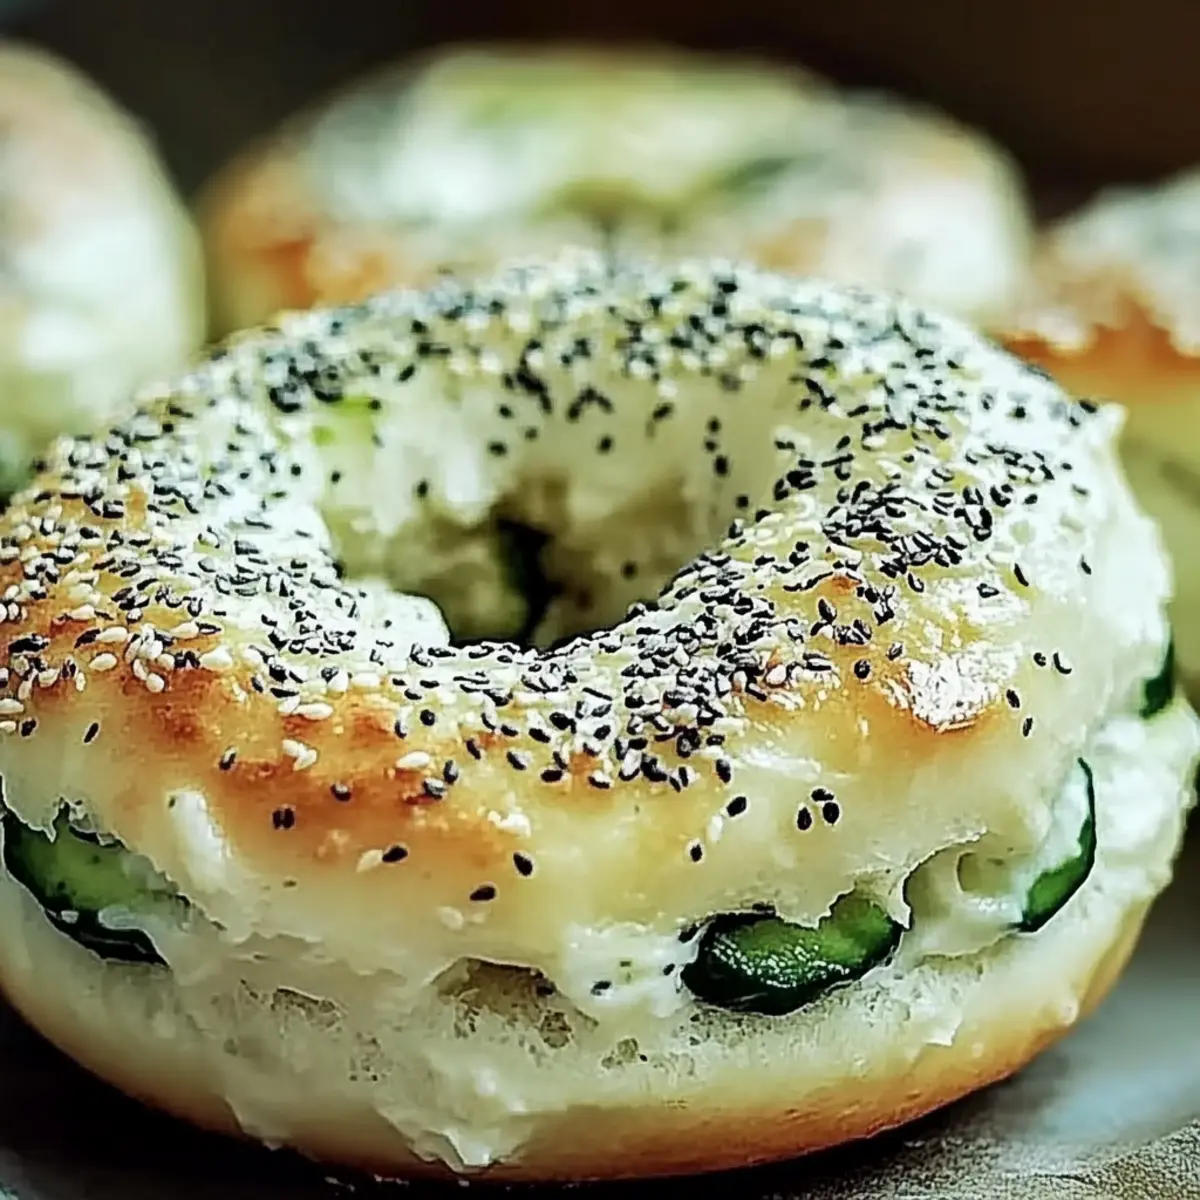
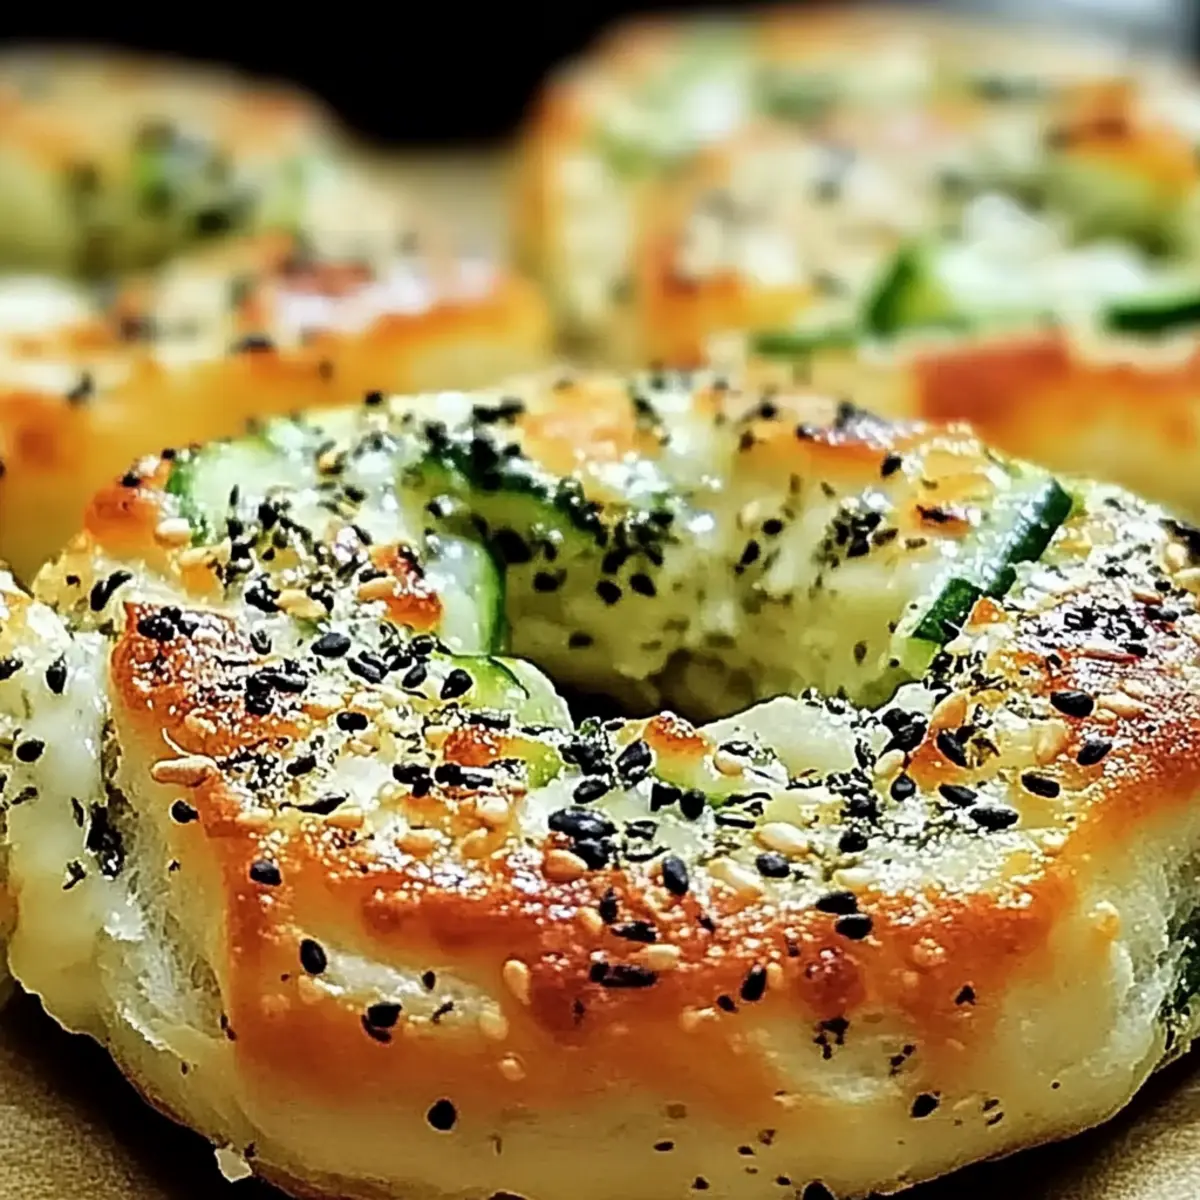
As I rummaged through my fridge one evening, I stumbled upon a couple of zucchinis begging for attention. Instead of tossing them into a boring stir-fry, I thought, why not elevate them into something extraordinary? That’s how these irresistible Zucchini Bagels were born. Not only are they a fantastic way to sneak in some veggies for picky eaters, but they also offer a healthier twist on a classic favorite. Imagine preparing these savory delights in just 35 minutes—perfect for a quick breakfast or a snack you can enjoy guilt-free. Topped with your choice of seeds and paired with cream cheese, hummus, or even avocado, these bagels are sure to delight both family and friends. Are you ready to transform your zucchini into a mouthwatering masterpiece?
Why Are These Zucchini Bagels So Special?
Endless versatility: These Zucchini Bagels can be customized with your favorite herbs and spices, allowing for personal touches in every batch.
Healthier choice: With nutrient-packed zucchini and almond flour, you're indulging guilt-free, perfect for those looking to cut back on carbs.
Quick preparation: Ready in just 35 minutes, these bagels fit perfectly into your busy schedule without sacrificing flavor.
Family-friendly: Even picky eaters will devour these delicious gems, making them the ideal crowd-pleaser for any meal.
Experience the joy of crafting perfect, veggie-packed bagels that everyone will love!
Zucchini Bagel Ingredients
For the Dough
• Zucchinis – Grated and moisture removed for a perfect bagel texture.
• Almond flour – A great low-carb base; can substitute with coconut flour if desired.
• Parmesan cheese – Adds a savory depth; use nutritional yeast for a dairy-free option.
• Egg – Binds the ingredients together; a flax egg works as a vegan substitute.
• Baking powder – Helps the bagels rise fluffily.
• Garlic powder – Infuses a robust flavor into the dough.
• Onion powder – Complements the garlic and enhances the taste.
• Salt – Just enough to bring all the flavors together.
For Topping
• Sesame seeds or poppy seeds – Sprinkle on top for added crunch and flavor.
These Zucchini Bagels are not only quick to make but also straightforward to customize, ensuring you'll satisfy every palate!
Step‑by‑Step Instructions for Zucchini Bagels
Step 1: Preheat the Oven
Begin by preheating your oven to 375°F (190°C). This ensures a perfectly baked finish for your Zucchini Bagels. While the oven heats up, line a baking sheet with parchment paper to prevent sticking and allow for easy cleanup.
Step 2: Prepare the Zucchini
Grate two medium zucchinis and place them in a clean kitchen towel. Squeeze out as much moisture as possible—this is crucial for achieving the right bagel texture. The drier the zucchini, the firmer your Zucchini Bagels will be when baked.
Step 3: Combine Dry Ingredients
In a mixing bowl, combine 1 cup of almond flour, ¼ cup of grated Parmesan cheese, 1 teaspoon of baking powder, 1 teaspoon of garlic powder, 1 teaspoon of onion powder, and ½ teaspoon of salt. Mix these dry ingredients thoroughly until evenly distributed, ensuring that your bagels are infused with flavor.
Step 4: Add Zucchini and Egg
Once your dry ingredients are well-combined, add the grated zucchini and one large egg to the bowl. Mix everything together thoroughly until you have a cohesive dough. This step brings the Zucchini Bagels together, binding the flavors and textures beautifully.
Step 5: Shape the Bagels
Divide the dough into six equal portions and gently shape each portion into a bagel on the prepared baking sheet. Make sure to create a hole in the center for an authentic bagel shape. This will help them bake evenly and give that beloved bagel appearance.
Step 6: Add Toppings
If desired, sprinkle sesame seeds or poppy seeds on top of each formed bagel for added flavor and a delightful crunch. This simple addition elevates your Zucchini Bagels and makes them visually appealing.
Step 7: Bake the Bagels
Place the baking sheet in the preheated oven and bake the Zucchini Bagels for about 20-25 minutes. You'll know they’re ready when they turn golden brown and a delightful aroma fills your kitchen. Keep an eye on them for that perfect golden hue.
Step 8: Cool and Serve
Once baked to perfection, remove the Zucchini Bagels from the oven and allow them to cool slightly on the baking sheet. This short cooling period enhances their texture, making them perfect for serving. Enjoy them fresh or with your favorite spreads!

Tips for the Best Zucchini Bagels
Moisture Matters: Always ensure to squeeze out excess moisture from the zucchini; too much water can make your Zucchini Bagels soggy.
Right Flour Choice: Stick with almond flour for a low-carb option, but if you use coconut flour, adjust quantities as it absorbs more moisture.
Egg Alternatives: If you're opting for a flax egg, remember to let it sit for a few minutes to thicken before mixing it into the dough.
Watch the Baking Time: Keep an eye on your bagels towards the end of the baking time. They should be golden brown but not overbaked.
Shape with Care: When forming your bagels, ensure the hole in the center is wide enough; it helps the bagels cook evenly.
Serve Fresh: For the best taste, serve your Zucchini Bagels fresh out of the oven or warm. They pair wonderfully with a variety of toppings!
What to Serve with Zucchini Bagels
The delightful aroma of fresh-baked bagels invites an array of scrumptious pairings to create a complete meal experience.
-
Creamy Cream Cheese: The rich, smooth texture complements the savory flavors of the bagels beautifully, creating a perfect balance.
-
Zesty Hummus: This flavorful option brings a burst of protein and fiber, while adding a delightful creaminess that pairs wonderfully with zucchini.
-
Sliced Avocado: Add some healthy fats by topping with fresh avocado; its buttery texture also enhances the bagel's flavor, making for a satisfying bite.
-
Smoked Salmon: For a touch of elegance, you can layer thin slices of smoked salmon, elevating your zucchini bagel to gourmet heights.
-
Herbed Goat Cheese: The tangy notes of goat cheese paired with fresh herbs create a luscious spread that elevates the zucchini bagels to new levels of deliciousness.
-
Salad Greens: A fresh mixed greens salad adds a crisp, refreshing contrast. Consider tossing in some cherry tomatoes and a light vinaigrette for extra zing.
-
Lightly Pickled Vegetables: The tanginess of pickled cucumbers or radishes brings a wonderful crunch that beautifully compliments the soft texture of the bagels.
-
Chilled Sparkling Water: Pair your meal with a glass of sparkling water with a twist of lemon or mint for a refreshing beverage that cleanses the palate.
Each pairing invites different textures and flavors, making your zucchini bagel experience lively and satisfying!
Storage Tips for Zucchini Bagels
Room Temperature: Let the Zucchini Bagels cool completely, then store them at room temperature for up to 2 days in a covered container.
Fridge: Place the cooled bagels in an airtight container in the fridge where they will stay fresh for up to 1 week.
Freezer: For longer storage, wrap each bagel individually in plastic wrap and freeze them for up to 3 months.
Reheating: When ready to enjoy, thaw overnight in the fridge and reheat in the oven at 350°F (175°C) for about 10 minutes to restore their delightful texture.
Zucchini Bagels: Variations & Substitutions
Feel free to explore the endless possibilities of flavors and textures with these delightful bagels—your creativity is the only limit!
- Gluten-Free: Substitute almond flour with a gluten-free all-purpose blend for a delicious bagel anyone can enjoy.
- Cheesy Herb: Add a tablespoon of dried Italian herbs and extra Parmesan for an aromatic Mediterranean twist.
- Spicy Kick: Incorporate a pinch of cayenne pepper or red pepper flakes to bring a delightful heat to your Zucchini Bagels.
- Sweet Surprise: For a unique breakfast twist, mix in a tablespoon of cinnamon and a teaspoon of honey to the dough.
- Meal Prep Friendly: Make a double batch and freeze half for quick breakfasts—simply reheat and enjoy any morning!
- Veggie Boost: Fold in finely chopped spinach or bell peppers for added nutrients and a pop of color.
- Nut-Free: Replace almond flour with sunflower seed flour to keep it nut-free while maintaining a delightful texture.
- Savory Feta: Crumble in some feta cheese for a tangy flavor contrast that pairs beautifully with the zucchini.
Let your imagination run wild with these variations—each bite of your Zucchini Bagels can be a new adventure!
Make Ahead Options
These Zucchini Bagels are fantastic for busy home cooks looking to save time! You can prepare the dough up to 24 hours in advance by mixing all dry ingredients and combining with the grated zucchini and egg. Simply cover the bowl tightly and refrigerate. When you're ready to bake, allow the mixture to come to room temperature, shape into bagels, and continue with the baking process. Additionally, you can shape the bagels and store them on the baking sheet covered with plastic wrap in the fridge for up to 3 days. Just remember to add the toppings right before baking for optimal crunch and flavor. By preparing ahead, you'll have delightful, homemade bagels ready to satisfy your cravings with minimal last-minute effort!

Zucchini Bagels Recipe FAQs
How do I select the right zucchinis for my bagels?
Absolutely! Look for firm zucchinis with a vibrant green color and no dark spots. They should feel heavy for their size. Medium-sized zucchinis work best, as they have the right balance of moisture and flavor for these Zucchini Bagels.
What is the best way to store the Zucchini Bagels?
For short-term storage, allow your Zucchini Bagels to cool completely, then keep them in an airtight container in the fridge for up to 1 week. For longer storage, wrap each bagel individually in plastic wrap and freeze them. They can last up to 3 months in the freezer, but remember to thaw overnight in the fridge before reheating.
Can I freeze the Zucchini Bagels? How?
Yes, indeed! To freeze your Zucchini Bagels, first let them cool completely. Then, wrap each bagel tightly in plastic wrap. Place them in a freezer-safe bag or container to prevent freezer burn. They can be stored for up to 3 months. When you're ready to enjoy them, simply thaw them overnight in the fridge, then reheat in the oven at 350°F (175°C) for about 10 minutes until warmed through.
What should I do if my bagels turn out too soggy?
Very often, soggy bagels result from excess moisture in the zucchini. Ensure you squeeze out as much liquid as possible before mixing it into the dough. If you face sogginess even after that, try adding a little extra almond flour to absorb moisture during baking.
Are these Zucchini Bagels safe for those with allergies?
They can be! These Zucchini Bagels can easily accommodate different dietary needs. For a dairy-free option, substitute Parmesan with nutritional yeast, and to make them vegan, replace the egg with a flax egg (1 tablespoon of flaxseed meal mixed with 2.5 tablespoons of water, let sit until thickened). Always double-check for personal allergens regarding your specific ingredients.
What toppings do you recommend for serving with these Zucchini Bagels?
The more the merrier! These bagels are perfect with a variety of toppings. You can enjoy them spread with cream cheese, hummus, or avocado for a fresh bite. Adding smoked salmon or your favorite veggies also makes for a delightful experience!
Easy Zucchini Bagels You Won't Want to Stop Eating
Ingredients
Equipment
Method
- Preheat your oven to 375°F (190°C) and line a baking sheet with parchment paper.
- Grate two medium zucchinis and squeeze out as much moisture as possible using a clean kitchen towel.
- In a mixing bowl, combine 1 cup of almond flour, ¼ cup of grated Parmesan cheese, 1 teaspoon of baking powder, 1 teaspoon of garlic powder, 1 teaspoon of onion powder, and ½ teaspoon of salt. Mix thoroughly.
- Add the grated zucchini and one large egg to the dry ingredients and mix until cohesive.
- Divide the dough into six portions and shape each into a bagel on the prepared baking sheet, ensuring a hole in the center.
- Sprinkle sesame or poppy seeds on top, if desired.
- Bake for about 20-25 minutes until golden brown.
- Allow to cool slightly before serving.


Leave a Reply