
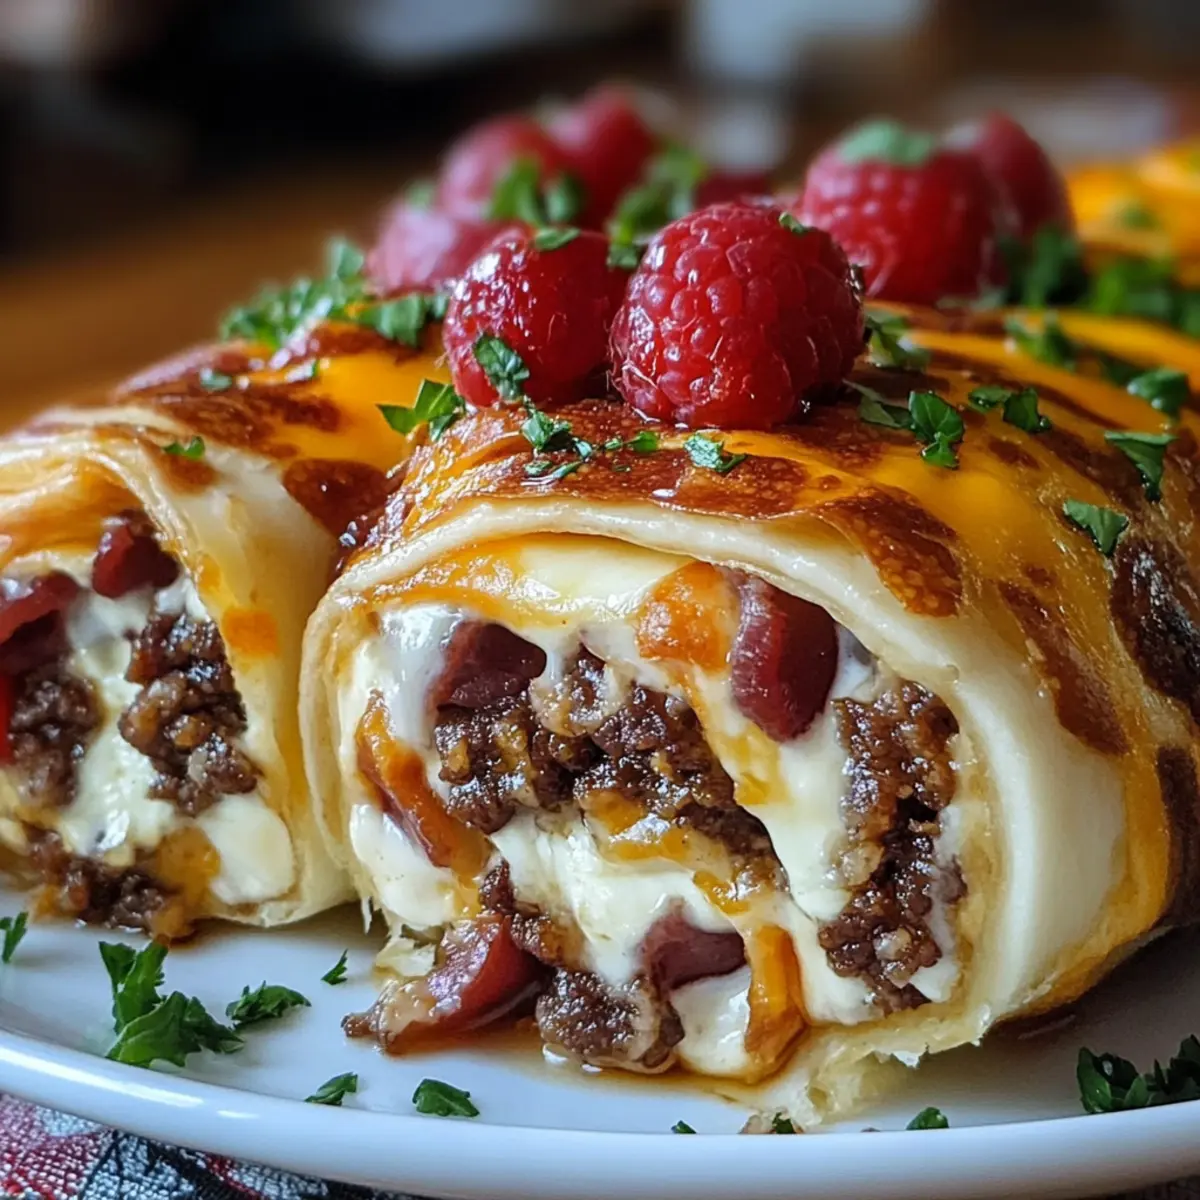
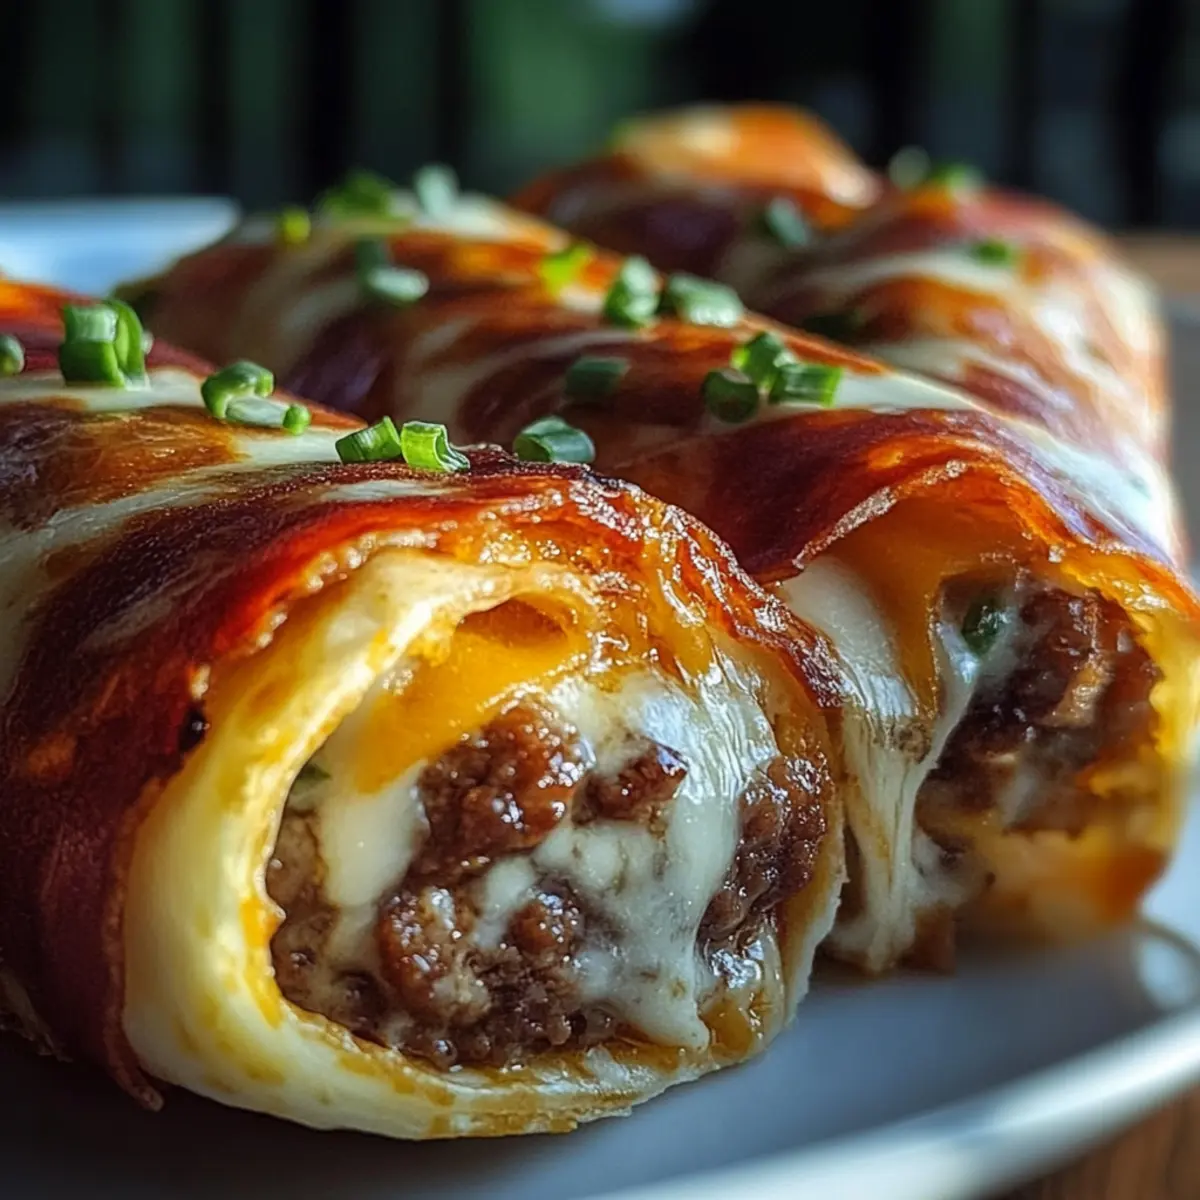
As I unroll a warm tortilla and envision a savory explosion of flavors, I can’t help but smile at the thought of Garlic Butter Bacon Cheeseburger Rollups. These delightful bites are not just a feast for the mouth; they're an escape from the mundane, perfect for anyone craving a quick yet satisfying meal. With just 25 minutes from start to finish, this recipe brings the joy of homemade cooking back into your kitchen without the fuss. Imagine crispy tortillas loaded with smoky bacon and gooey cheese, all embraced by a buttery garlic infusion. Whether you're hosting game night or simply indulging in a cozy dinner, these rollups are sure to charm your taste buds and warm your heart. Curious to see how easy it is to recreate this crowd-pleaser? Let’s dive in!

Why Are These Rollups So Irresistible?
Simplicity: With just a handful of ingredients, your time in the kitchen is kept to a minimum—perfect for busy nights!
Flavor Explosion: The rich garlic butter pairs beautifully with crispy bacon and melty cheese, resulting in a flavor combination that will please even the pickiest eaters.
Versatile Delight: Whether served as an appetizer, game day snack, or a light dinner, these rollups are adaptable, making them a star at any gathering.
Crowd-Pleasing Appeal: Who can resist a warm, cheesy rollup? These bites are guaranteed to vanish quickly from your serving platter!
Fast to Make: In just 25 minutes, from prep to plate, you’ll have a delicious homemade meal that outshines any fast food option.
Enjoy these Garlic Butter Bacon Cheeseburger Rollups that are a fun twist on your favorite flavors, all while being quick and easy to prepare!
Garlic Butter Bacon Cheeseburger Rollups Ingredients
• Ready to create your own delicious Garlic Butter Bacon Cheeseburger Rollups? Here's everything you need!
For the Garlic Butter
- Butter – adds richness and a wonderful base for flavor.
- Garlic – minced for a fragrant burst that elevates the entire dish.
- Dried Parsley – introduces a hint of freshness and color.
- Salt – enhances every savory note in the rollups.
- Black Pepper – adds a slight kick to balance the flavors.
For the Rollups
- Flour Tortillas – the perfect vessels for all that cheesy goodness, choose large ones for easier wrapping.
- Crumpled Bacon – brings that irresistible smoky flavor, making these rollups a true delight.
- Shredded Mozzarella Cheese – melts beautifully for a gooey texture.
- Shredded Cheddar Cheese – adds a sharp flavor that complements the bacon wonderfully.
Optional Topping
- Fresh Chives – sprinkle these for a burst of color and a mild onion punch if desired.
Gather your ingredients, and let's roll into making these mouthwatering Garlic Butter Bacon Cheeseburger Rollups!
Step‑by‑Step Instructions for Garlic Butter Bacon Cheeseburger Rollups
Step 1: Preheat the Oven
Start by preheating your oven to 190°C (375°F). This will ensure that your Garlic Butter Bacon Cheeseburger Rollups bake evenly and achieve that perfect crispy texture. As the oven heats up, gather your ingredients and prep the workspace for cooking. A clean, organized space makes the process smooth and enjoyable.
Step 2: Prepare the Garlic Butter Mixture
In a small bowl, combine ¼ cup of melted butter, 2 cloves of minced garlic, 1 teaspoon of dried parsley, ½ teaspoon of salt, and ¼ teaspoon of black pepper. Whisk them together until well mixed, creating a fragrant garlic butter mixture. This rich blend will be the key to adding flavor to your rollups and making them irresistibly delicious.
Step 3: Brush the Tortillas
Lay out 6 large flour tortillas on a clean surface. Using a pastry brush, generously coat each tortilla with the garlic butter mixture, ensuring every inch is covered. This step is crucial for infusing the rollups with that beloved garlic flavor. You want to see a glossy sheen from the butter on the tortillas before adding the fillings.
Step 4: Add the Bacon
Next, sprinkle 1 cup of crumbled bacon evenly across the tortillas, ensuring that every bite will be filled with that smoky goodness. Distributing the bacon evenly is key, so every rollup is bursting with flavor. The temptation to snag a piece of bacon is high, but save it for the rollups!
Step 5: Top with Cheese
Now it’s time to bring on the cheese! Sprinkle ½ cup of shredded mozzarella cheese followed by ½ cup of shredded cheddar cheese over the bacon. The combination of these melt-in-your-mouth cheeses will create the perfect gooey texture as they bake. Spread the cheese out evenly to ensure a deliciously cheesy experience in each rollup.
Step 6: Roll Up the Tortillas
Starting from the edge closest to you, roll each tortilla up tightly. The goal is to create a snug log of deliciousness filled with bacon and cheesy goodness. As you roll, make sure to keep the fillings tucked inside to prevent any spills while baking. Once rolled, place seam-side down to secure each rollup.
Step 7: Prepare for Baking
Position your rolled tortillas seam-side down on a parchment-lined baking sheet. This prevents sticking and makes for easy cleanup afterward. Arrange them with a little space in between to allow for even cooking. The parchment paper will also help achieve that golden brown finish you’re aiming for!
Step 8: Brush with Remaining Garlic Butter
Using any remaining garlic butter mixture, brush the tops of the rollups generously. This final touch will not only enhance the flavor but also promote a beautiful, crispy exterior as they bake. Don’t be shy with the butter—it’s what brings out that incredible garlic essence!
Step 9: Bake to Perfection
Slide the baking sheet into the preheated oven and bake for 12-15 minutes. Keep an eye on them as they near the end of baking time; you’re looking for a golden brown, crispy exterior. The rollups should be slightly puffed and smell heavenly by the time they’re done.
Step 10: Cool and Slice
Once out of the oven, let the Garlic Butter Bacon Cheeseburger Rollups cool for a few minutes on the baking sheet. This rest time allows the cheese to set slightly for easy slicing. When they are just warm to the touch, slice each rollup into bite-sized pieces, perfect for sharing.
Step 11: Serve with Style
Arrange your beautifully sliced rollups on a serving platter. If desired, garnish with fresh chives for a burst of color and mild onion flavor. These delightful Garlic Butter Bacon Cheeseburger Rollups are ready to shine at your gathering or family meal, sure to wow everyone at the table!
Make Ahead Options
These Garlic Butter Bacon Cheeseburger Rollups are perfect for busy home cooks looking to streamline meal prep! You can prepare the rollups up to 24 hours in advance by assembling them fully, covering with plastic wrap, and refrigerating. This not only saves you valuable time later but ensures the flavors meld beautifully overnight. When you're ready to serve, simply brush the tops with any remaining garlic butter and bake them straight from the fridge, adding a few extra minutes to the cook time for a crispy finish. Just remember, for optimal quality, avoid stacking the rollups too tightly in the fridge to maintain their shape and texture! Enjoy these delicious bites anytime with minimal effort!
Helpful Tricks for Garlic Butter Bacon Cheeseburger Rollups
-
Perfect Tortilla Roll: Keep the tortillas warm before rolling; this makes them more pliable and prevents cracking as you tightly roll them up.
-
Even Filling Distribution: Be mindful to spread the bacon and cheese evenly across the tortillas so each bite is flavorful. This avoids the common mistake of uneven filling!
-
Crispy Delight: Brush the tops of the rollups with enough garlic butter before baking for a beautifully golden and crispy exterior. Don’t skimp on this step!
-
Baking Sheet Prep: Use parchment paper on your baking sheet to prevent sticking and to make cleanup easier. It's a simple trick that goes a long way!
-
Cooling Time: Allow the rollups to cool slightly before slicing for easier handling. This helps maintain their shape and gooey filling after baking.
Enjoy creating your delicious Garlic Butter Bacon Cheeseburger Rollups with these helpful tips!
What to Serve with Garlic Butter Bacon Cheeseburger Rollups
Pairing the savory, gooey rollups with complementary sides elevates your meal to new heights.
-
Creamy Coleslaw: A refreshing side that balances the richness of the rollups, adding a crunch that's delightful with every bite.
-
Crispy Sweet Potato Fries: These provide a sweet contrast and a fun crunch, perfect for dipping alongside the cheesy goodness.
-
Garlic Parmesan Green Beans: Tender green beans tossed in savory garlic and cheese enhance the meal's flavor spectrum effortlessly.
-
Classic Caesar Salad: A crisp salad with a creamy dressing brings a zesty freshness that pairs beautifully with the flavors of the rollups.
-
Buffalo Cauliflower Bites: This spicy, tangy snack offers a wonderful contrast—great for those who love a kick in their meal.
-
Homemade Ranch Dressing: Serve this as a dipping sauce; its cool creaminess complements the hot, cheesy rollups.
-
Iced Lemonade: A refreshing drink that cuts through the richness of the rollups, making for a delightful sunny day pairing.
-
Chocolate Chip Cookies: End your meal on a sweet note with these warm, gooey cookies; a nostalgic treat everyone loves!
Each of these options brings a unique texture or flavor, making your dining experience memorable!
Garlic Butter Bacon Cheeseburger Rollups Variations
Feel free to get creative and customize your rollups for a personal touch that delights the senses!
-
Spicy Kick: Add jalapeño slices for an extra spicy layer that will elevate your rollups to fiery perfection. Perfect for those who crave heat!
-
Veggie-Loaded: Incorporate finely chopped bell peppers or onions for a crunchy, vibrant twist. This addition not only enhances texture but brings a burst of freshness.
-
Cheesy Delight: Use a blend of gouda and pepper jack for an extravagant cheese experience. These flavors meld beautifully with the garlic butter and bacon!
-
Gluten-Free: Swap out the flour tortillas for gluten-free alternatives, allowing everyone to savor the delights, regardless of dietary needs.
-
Herbed Twist: Mix fresh herbs like basil or oregano into the garlic butter for a fragrant, garden-fresh zing. Your taste buds will thank you for this herbaceous twist!
-
Sweet & Savory: Add a drizzle of honey or BBQ sauce before rolling for an unexpected sweet touch that pairs wonderfully with the salty bacon.
-
Protein Punch: Swap crumbled bacon for shredded rotisserie chicken or turkey to give your rollups a different, leaner profile without sacrificing flavor.
-
Breakfast Rollups: Try filling them with scrambled eggs and bacon for a delightful breakfast treat that can be enjoyed any time of day! They become a hearty morning staple.
How to Store and Freeze Garlic Butter Bacon Cheeseburger Rollups
Room Temperature: Keep any leftover rollups at room temperature for up to 2 hours. After that, refrigerate them to maintain freshness and prevent spoilage.
Fridge: Store the Garlic Butter Bacon Cheeseburger Rollups in an airtight container for up to 3 days. Reheat in the oven or microwave to rejuvenate their crispy texture.
Freezer: For longer storage, freeze the rollups individually wrapped in plastic wrap, then place them in a freezer-safe bag for up to 2 months.
Reheating: When ready to enjoy, reheat from frozen in a preheated oven at 190°C (375°F) for about 15-20 minutes until heated through and crispy.

Garlic Butter Bacon Cheeseburger Rollups Recipe FAQs
How do I select the best tortillas for my rollups?
Absolutely! I recommend opting for large flour tortillas over corn ones as they tend to be more pliable and can hold the fillings better. Look for tortillas that are fresh with no visible mold or dark spots for the best texture and taste.
What’s the best way to store leftover rollups?
You can keep your Garlic Butter Bacon Cheeseburger Rollups in an airtight container in the fridge for up to 3 days. If you prefer them warm and crispy, simply reheat them in an oven preheated to 190°C (375°F) for about 10-12 minutes.
Can I freeze these rollups for later?
Certainly! To freeze your rollups, first, let them cool completely. Then, wrap each rollup tightly in plastic wrap, and place them in a freezer-safe bag. They can be stored for up to 2 months. When you’re ready to enjoy them, unfreeze and reheat directly from the freezer in a preheated oven for about 15-20 minutes!
What should I do if my rollups won’t stay rolled?
If your rollups tend to unroll, it might be due to overfilling or not rolling them tightly enough. To fix this, ensure you spread the fillings evenly and keep the roll snug as you go. If they still unravel, secure them with toothpicks while baking.
Are these rollups suitable for children or those with dietary restrictions?
Very! These Garlic Butter Bacon Cheeseburger Rollups can be made kid-friendly by adjusting the level of garlic or cheese used. For dietary restrictions, feel free to swap in gluten-free tortillas or use a dairy-free cheese alternative to suit your needs. Enjoying comforting, homemade flavors shouldn't be off-limits for anyone!
How long will the rollups stay fresh when stored at room temperature?
For safety, it’s best to keep the rollups at room temperature for no more than 2 hours. After that, they should be refrigerated to prevent spoilage. If you're serving them at a gathering, consider placing them in a warming tray to maintain that deliciously crispy texture while you enjoy the party!
Irresistible Garlic Butter Bacon Cheeseburger Rollups Recipe
Ingredients
Equipment
Method
- Preheat your oven to 190°C (375°F).
- In a small bowl, combine melted butter, minced garlic, dried parsley, salt, and black pepper. Whisk until well mixed.
- Lay out the flour tortillas on a clean surface and brush each with the garlic butter mixture.
- Sprinkle crumbled bacon evenly across the tortillas.
- Top with shredded mozzarella and cheddar cheese.
- Roll each tortilla up tightly and secure seam-side down.
- Place rolled tortillas on a parchment-lined baking sheet with space in between.
- Brush the tops of the rollups with any remaining garlic butter.
- Bake for 12-15 minutes until golden brown and crispy.
- Let rollups cool for a few minutes before slicing into bite-sized pieces.
- Serve garnished with fresh chives if desired.


Leave a Reply