“Did you know that those adorable Starbucks Cake Pops you crave can be made right in your own kitchen?” Every time I see those bite-sized treats, I think about how easy it is to recreate them and impress friends and family. With just a box of classic vanilla cake mix and some colorful candy melts, you can whip up a batch of these delightful Cake Pops in no time! They’re perfect for satisfying a sweet tooth while also being a huge crowd-pleaser at parties or gatherings. Plus, you’ll love how simple the process is—great for those moments when you want to make something special without spending hours in the kitchen. Ready to bring a little café magic to your home? Let’s dive into the world of Cake Pops!

Why Are Cake Pops So Irresistible?
Versatile Treat: Cake pops can be customized with different flavors and colors, making them perfect for any occasion.
Easy to Make: With just a few simple ingredients, you can create a batch in under an hour.
Kid-Approved: Children love the fun and bite-sized nature of these treats, making them a hit at parties!
Perfect for Sharing: These delightful pops are easy to transport and share—ideal for gatherings or gifting.
Visually Stunning: The vibrant colors and fun sprinkles make them not just tasty, but a beautiful addition to any dessert table.
Who wouldn't love to impress their friends with these delightful Cake Pops?
Cake Pops Ingredients
For the Cake Base
• Box classic vanilla cake mix – The foundation for your cake pops; choose a favorite mix for quality flavor.
• Eggs, water, and oil – Use the ingredients specified on the cake mix box to ensure a moist cake.
For the Frosting Mixture
• Vanilla frosting – Just 3 tablespoons needed to bind the cake and enhance flavor; store-bought makes it quick!
For Assembly
• Cake pop sticks or lollipop sticks – 24-36 sticks hold your cake pops upright and are useful for dipping.
• Pink candy melts – 12 ounces are perfect for coating; try other colors to match your theme!
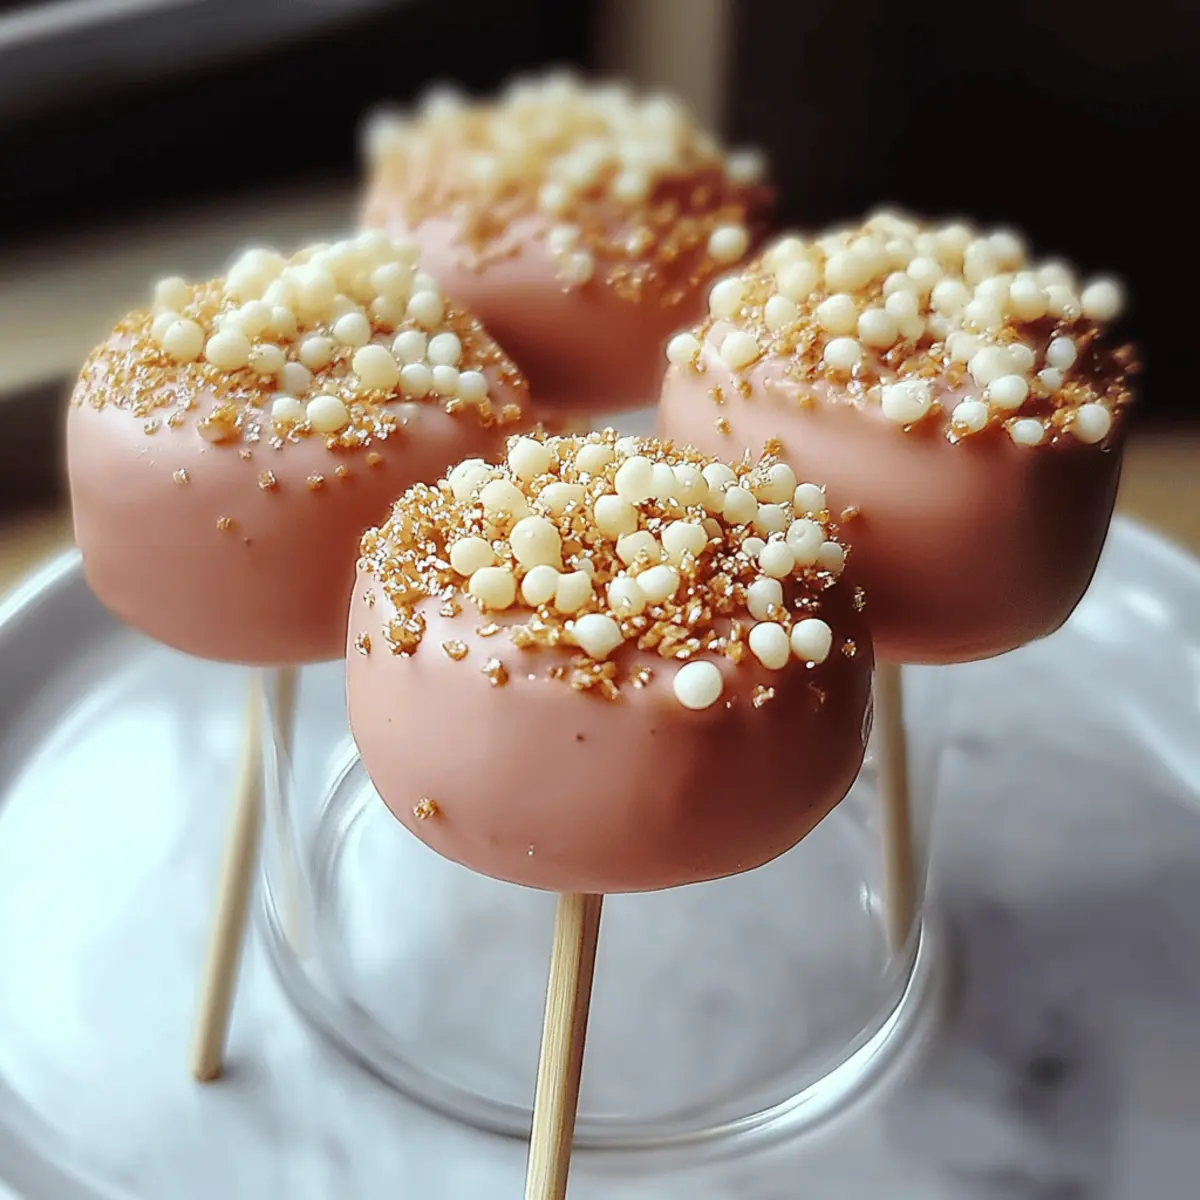
• White sprinkles – These add a delightful crunch and visual appeal, making your cake pops even more irresistible!
Get ready to create those scrumptious Cake Pops that’ll have everyone coming back for seconds!
Step‑by‑Step Instructions for Cake Pops
Step 1: Prepare the Cake Mix
Begin by preheating your oven to 350°F (175°C). In a mixing bowl, combine the ingredients listed on your classic vanilla cake mix box—typically eggs, water, and oil. Blend until smooth, then pour the batter evenly into a greased baking pan. Bake for about 30 minutes or until a toothpick inserted in the center comes out clean. Let the cake cool completely at room temperature.
Step 2: Crumble the Cake
Once your cake has cooled, carefully remove it from the pan and discard the brown outer crust. Transfer the soft cake to a large mixing bowl and crumble it into fine pieces using your hands or a fork. The crumbled texture should be fluffy and soft, allowing it to bind well with the frosting in the next step.
Step 3: Mix with Frosting
Add 3 tablespoons of vanilla frosting to the crumbled cake. Using your hands or a spatula, mix the frosting and cake crumbs together until fully combined. The mixture should be moist and sticky, enabling you to shape it easily into cake balls later. If needed, adjust the amount of frosting to achieve the right consistency.
Step 4: Shape the Cake Balls
With your hands, scoop out portions of the cake mixture using a cookie scoop, shaping them into 24-36 evenly sized balls. Place these cake balls on a lined cookie sheet, arranging them in a single layer. They should be firm and well-rounded to ensure they hold their shape during the dipping process.
Step 5: Melt the Candy Coating
In a microwave-safe bowl, add the 12 ounces of pink candy melts. Microwave in 30-second intervals, stirring after each interval until the candy melts are smooth and completely melted. The consistency should be drizzle-able but thick; if it’s too thick, add a small amount of vegetable oil to thin it out.
Step 6: Insert Cake Pop Sticks
Take a cake pop stick and dip the tip into the melted candy coating. Carefully insert the stick halfway into each cake ball, ensuring it holds. This step helps to anchor the stick and prevents the cake pop from falling off later. Once all the sticks are inserted, place the cookie sheet in the freezer for 10-15 minutes to firm up.
Step 7: Dip the Cake Pops
After freezing, retrieve your cake pops and dip each one fully into the melted candy coating. Allow the excess candy coating to drip off back into the bowl, ensuring a smooth finish. Aim for an even layer that completely covers the cake ball, giving it that delightful candy shell look.
Step 8: Decorate the Cake Pops
Stand your dipped cake pops upright in a styrofoam block or a cardboard box to set. Before the candy coating hardens, generously sprinkle the white sprinkles over each pop for added decoration and texture. This is the time to be creative with your toppings as well!
Step 9: Allow to Harden
Let the cake pops dry completely at room temperature, ensuring the coating is firmly set. This takes about 15-20 minutes. Once hardened, your delicious Cake Pops are ready to be enjoyed or served at your next gathering—perfectly sweet and visually appealing!
Expert Tips for Cake Pops
-
Perfectly Crumbled Cake: Make sure the cake is crumbled into fine pieces for better binding with the frosting, avoiding large lumps which can affect shaping.
-
Chill the Mixture: After mixing the cake with frosting, chill the mixture for a few minutes before shaping into balls. This helps them hold their shape better.
-
Candy Melt Consistency: If the candy melts are too thick, add a teaspoon of vegetable oil to achieve a smoother melting consistency perfect for dipping.
-
Avoid Over-Dipping: Be cautious with excess coating; letting too much candy melt drip off can lead to uneven finishes or a heavy shell.
-
Creative Sprinkles: Don't be afraid to experiment with different colored sprinkles or edible decorations to match your theme, making your cake pops visually stunning!
-
Storage Solutions: If you have leftovers, store cake pops in an airtight container at room temperature for up to 2-3 days to keep them tasting fresh.
Make Ahead Options
These delightful Cake Pops are perfect for busy home cooks looking to save time! You can prepare the cake base up to 24 hours in advance by baking it, letting it cool, and then crumbling it. Store the crumbled cake covered in the refrigerator to maintain its freshness. Additionally, you can shape the cake balls and freeze them for up to 3 days before dipping them in candy melts. Just remember to let them firm up in the freezer for about 10-15 minutes before dipping. When you’re ready to finish making your Cake Pops, simply melt the candy, coat the frozen balls, and let them dry before serving—ensuring they’re just as delicious as if made fresh!
Cake Pops Variations & Substitutions
Feel free to get creative and make these cake pops uniquely yours—they’ll be even more delightful!
-
Chocolate Cake: Swap the vanilla cake mix for chocolate for an indulgent flavor twist that chocolate lovers will adore.
-
Nut-Free: Replace the vanilla frosting with a nut-free alternative—like a classic buttercream—to keep it safe for all guests.
-
Dairy-Free: Use a dairy-free cake mix and frosting to cater to lactose-intolerant friends, ensuring inclusivity at your next gathering.
-
Colorful Coatings: Experiment with different colored candy melts, allowing you to match your party theme or celebrate a special occasion in style.
-
Flavor Boost: Add a splash of almond extract to the cake mixture for an unexpected flavor depth that surprises the palate beautifully.
-
Add-Ins: Toss in mini chocolate chips or sprinkles to the cake batter before baking to introduce delightful surprises in every bite.
-
Spicy Kick: Incorporate a pinch of cayenne pepper into the chocolate coating for an exciting heat that pairs wonderfully with sweet flavors.
-
Decorative Toppings: Go beyond sprinkles by adding coconut flakes, crushed nuts, or edible glitter on top for a stunning finish that elevates the presentation!
Let your imagination run wild—these variations will create cake pops that are not just tasty, but also a feast for the eyes!
Storage Tips for Cake Pops
Room Temperature: Store cake pops in an airtight container at room temperature for up to 2-3 days to maintain their freshness and flavor.
Fridge: If you plan to enjoy them a bit longer, refrigerate the cake pops in an airtight container for up to 4 days, ensuring they stay moist.
Freezer: For extended storage, freeze the cake pops for up to a month. Wrap them individually in plastic wrap and store in an airtight container.
Thawing: Thaw frozen cake pops in the refrigerator overnight before serving to maintain their delightful taste and texture.
What to Serve with Starbucks Cake Pops
Transform your delightful cake pops into a full-on festive treat with these scrumptious complements that will elevate your dessert experience.
-
Rich Chocolate Mousse: This silky dessert offers a deep, luscious flavor that pairs beautifully with sweet cake pops. The contrast between the airy mousse and the dense pop is utterly indulgent.
-
Fruit Salad: A light mix of seasonal fruits adds a refreshing brightness to balance out the sweetness of the cake pops. The pops of color and flavor from the fruit will make your dessert table even more inviting.
-
Coffee or Espresso: Serving your cake pops alongside a rich, dark coffee or a bold espresso creates a lovely contrast between sweetness and bitterness. It's the perfect pairing for dessert lovers!
-
Vanilla Ice Cream: The creamy, cool vanilla ice cream melts in your mouth and complements the sweetness of the cake pops perfectly. It makes for an enjoyable texture contrast—smooth versus chewy!
-
Milkshake: A thick and creamy milkshake, whether chocolate or vanilla, adds a nostalgic element that elevates your cake pops to a whole new level of fun.
-
Creamy Cheesecake: The tangy flavor of cheesecake balances out the sweetness from the cake pops, creating a decadent duo. Drizzle some fruit sauce on top for an extra zing!
-
Sparkling Water: For a refreshing non-sweet option, serve your cake pops with ice-cold sparkling water infused with lemon or mint. It's a great palate cleanser that keeps things light.
-
Chocolate Fondue: For an interactive treat, provide a chocolate fondue fountain. Dip your cake pops into the warm chocolate for an extra layer of indulgence that friends and family will love!

Starbucks Cake Pops Recipe FAQs
What kind of cake mix should I use for the cake pops?
Absolutely! A classic vanilla cake mix works perfectly for these cake pops, but feel free to experiment with other flavors like chocolate or red velvet for a fun twist.
How do I store leftover cake pops?
For the best flavor and freshness, store your cake pops in an airtight container at room temperature for up to 2-3 days. If you want to keep them longer, refrigerate them for up to 4 days. Be sure they’re sealed well to avoid drying out!
Can cake pops be frozen?
Yes, definitely! To freeze your cake pops, wrap each one individually in plastic wrap and place them in an airtight container. They can be stored in the freezer for up to a month. When you’re ready to enjoy, simply thaw them in the refrigerator overnight to maintain their delicious texture.
What if my candy melts are thick when melting?
If you find that your candy melts are too thick, don’t worry! Just add a teaspoon of vegetable oil to the melted candy and stir until it reaches a smooth, drizzle-able consistency that’s perfect for dipping. This will ensure an even coating on your cake pops.
Are there any dietary considerations I should be aware of?
Of course! Always check the ingredients on your cake mix and candy melts for potential allergens like gluten, dairy, or nuts. If you're making these for a gathering, it's a good idea to ask about any dietary restrictions your guests may have to ensure everyone can enjoy these delightful cake pops!
Can I make cake pops in advance for a party?
Certainly! You can make cake pops up to a day in advance. Just make sure to store them properly in an airtight container to keep them fresh. They’re a fantastic make-ahead treat, allowing you to spend less time in the kitchen the day of your event!

Delicious Cake Pops You'll Want to Make Again and Again
Ingredients
Equipment
Method
- Preheat your oven to 350°F (175°C). In a mixing bowl, combine the ingredients listed on your cake mix box. Blend until smooth, then pour into a greased baking pan. Bake for about 30 minutes or until a toothpick comes out clean. Let cool completely.
- Once the cake has cooled, remove it from the pan and discard the outer crust. Transfer the cake to a bowl and crumble it into fine pieces.
- Add 3 tablespoons of vanilla frosting to the crumbled cake. Mix together until fully combined and moist.
- Scoop out portions using a cookie scoop, shaping into 24-36 balls. Place them on a lined cookie sheet.
- Melt the pink candy melts in a microwave-safe bowl, stirring until smooth. If too thick, add a small amount of vegetable oil.
- Dip the tip of each stick into the melted candy, then insert halfway into each cake ball. Freeze for 10-15 minutes to firm up.
- Dip each cake pop fully into the melted candy coating, allowing excess to drip off.
- Stand the dipped cake pops upright to set. While coating is still wet, sprinkle white sprinkles for decoration.
- Let the cake pops dry completely at room temperature, about 15-20 minutes, before serving.


Leave a Reply